About Schedules
Creating a schedule is a critical step in setting up a package. Schedules determine the availability of a package and each package has its own schedule(s). The Schedule Builder also let's you set hours and pricing for a package. Packages may have multiple schedules for different date ranges, enabling you to plan ahead for holidays and venue closures.
This article will explain how you can:
Create a Schedule
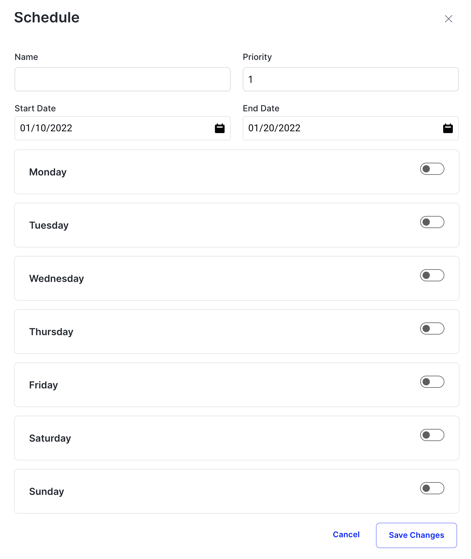
To create a schedule for a package you must first select the desired package by logging in to the admin dashboard and navigating to Venues > Packages > Choose a Package. At the top of the screen you will see a module titled “Schedule.” Click on the
Add a Schedule button to open up the schedule builder. You will see the pop up for the schedule builder with the following inputs:
Name
Start by naming your schedule. For example, “Main Schedule.” This will help you easily identify your schedule if you have multiple schedules.
Priority
Assign a priority (1-100). Higher priority schedules take precedence over lower ones.
Schedule Date
Set the start and end dates for the schedule. For a main schedule, set an end date a few years in the future.
Schedule Type:
-
-
- Based on Resource Manager: This is the most common schedule type and will pull availability from the resource manager. When using this option make sure that your package is assigned to a specific resource category. Link
- Custom Availability: Manually enter availability for the package.
- Based on Guest Count: Ideal for packages based on guest count (e.g., ticketed events).
-
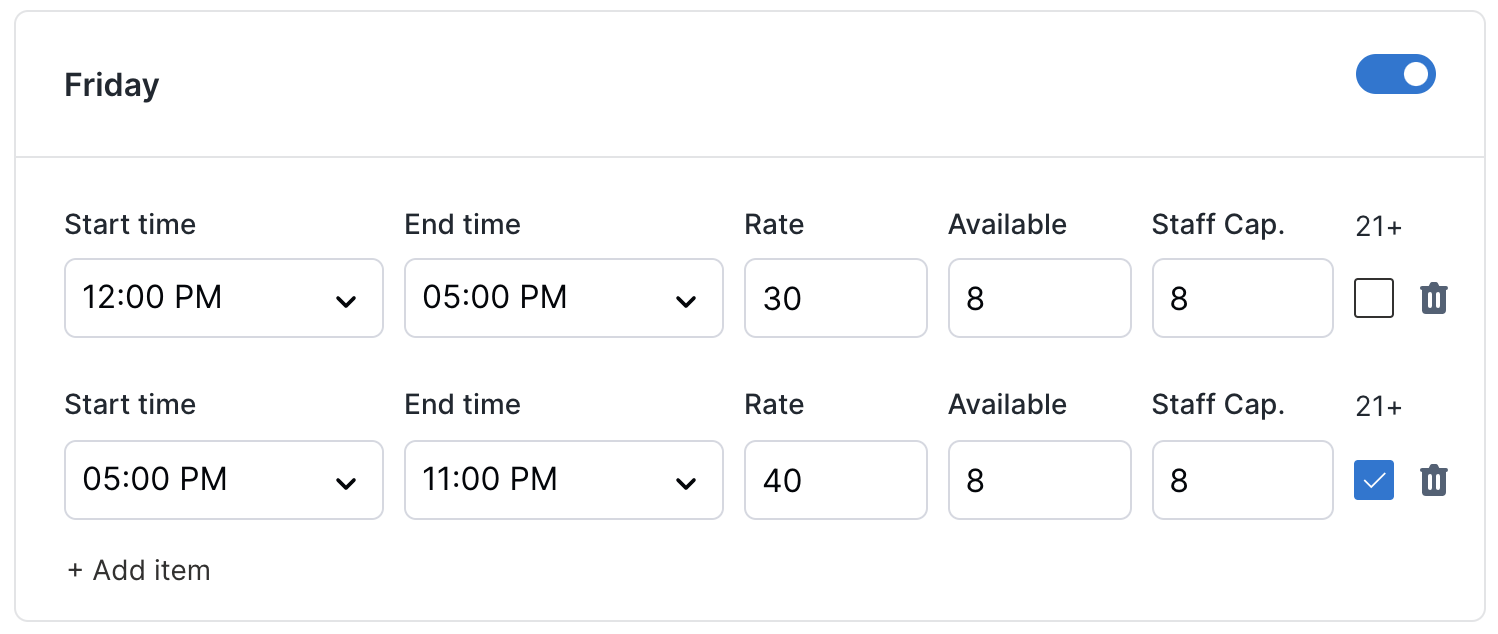
Toggle on the days of the week the schedule should be active.
-
- Time: Use the time selector for start and end times (e.g., 10:00 AM - 11:00 PM).
- Rate: Enter the price guests will pay for reservations on that specific day and time.
- Available: Specify the number of resources available. Disabled if using the Resource Manager.
- Staff Capacity: Limits the number of reservations for a time slot.
- Age Verification (21+): Check this box if your venue has age restrictions.
- Start Time Only: Allows reservations to be booked only at the specified start times.
Note: You can split daily hours into multiple blocks to charge different prices or change availability. For example, $30.00 from 12:00 PM - 5:00 PM and $40.00 after 5:00 PM.
Save Changes
Once all days are added, click Save Changes to publish the schedule.
To edit, delete, or clone a schedule, click the three dots and select the desired action.
Close or Modify Hours for a Single Day

If you need to close, update your hours, or change availability for a specific day you are able to do that by creating a new schedule for a package.
1. Clone the Main Schedule:
- Click the three dots on the main schedule and select Clone.
- Give the new schedule a different name (e.g., “Jan 20 Venue Buyout”).
- Set the start and end dates to the same day (e.g., Jan 20).
2. Adjust Priority:
- Set the new schedule to a higher priority than the original.
- Navigate to the specific day and update the times and availability.
- Click Save.
- Check your reservation page by going to the specified date range to ensure the page reflects the changes correctly.
Note: After the end date, the schedule will revert to the Main Schedule.
Create a Holiday Schedule
For modifying hours over multiple days:
- Clone the Main Schedule:
- Follow the same steps as closing for a single day.
- Set the date range for the new schedule (e.g., Dec 23 - Jan 2).
- Check your reservation page to ensure the changes have succesfully been made.
Create a Calendar Block
Another way to close your calendar for a specific date is to set blocks in the Host App.
This method is the quickest method of blocking reservations on specific days. First, head to the Host App , click Create in the top right, and toggle to the Block tab.
Select the date(s) you would like the venue to be closed and give this block a name (ie: July 4 - closed)
Select the hours your venue will be closed, and select which resources will be unable to be reserved during the closure.
Once your resources are selected, click save. This will create a block on all resources selected on the dates and times chosen, preventing reservations from being made. Now, guests are unable to make reservations.

-gif.gif?width=688&height=295&name=chrome-capture-2024-5-23%20(1)-gif.gif)
-gif.gif?width=688&height=295&name=chrome-capture-2024-5-23%20(2)-gif.gif)