Add-ons: sell optional extras alongside packages
Add-ons are optional extras a guest can buy alongside a package — the upsells that turn a basic booking into a bigger ticket. A few real examples:
- A birthday package offers a cake, a balloon bundle, and a souvenir photo.
- A bowling lane offers shoe rental priced per guest and a pitcher of soda.
- An axe-throwing session offers a coaching add-on and a t-shirt.
You build each add-on once, set how it's priced, then assign it to the packages it belongs to. Once a package has at least one add-on, guests see a dedicated Add Ons step in the booking flow, right after they pick a time and before checkout.
Add-ons are reusable. Build "Shoe rental" once and assign it to every bowling package — you don't recreate it per package. Tax, fees, and POS mapping are then set per package, so the same add-on can be taxed differently at different venues.
Create an add-on
Open the Add Ons page
In the left sidebar, open Manage and click Add Ons. You'll see every add-on you've built. Click Create Add on in the top-right.
Name the add-on and save
In the dialog, enter the guest-facing Name (and an internal name and short description if you like), then click Save changes. Rex creates the add-on and opens its detail page, which has two tabs: General and Assign.
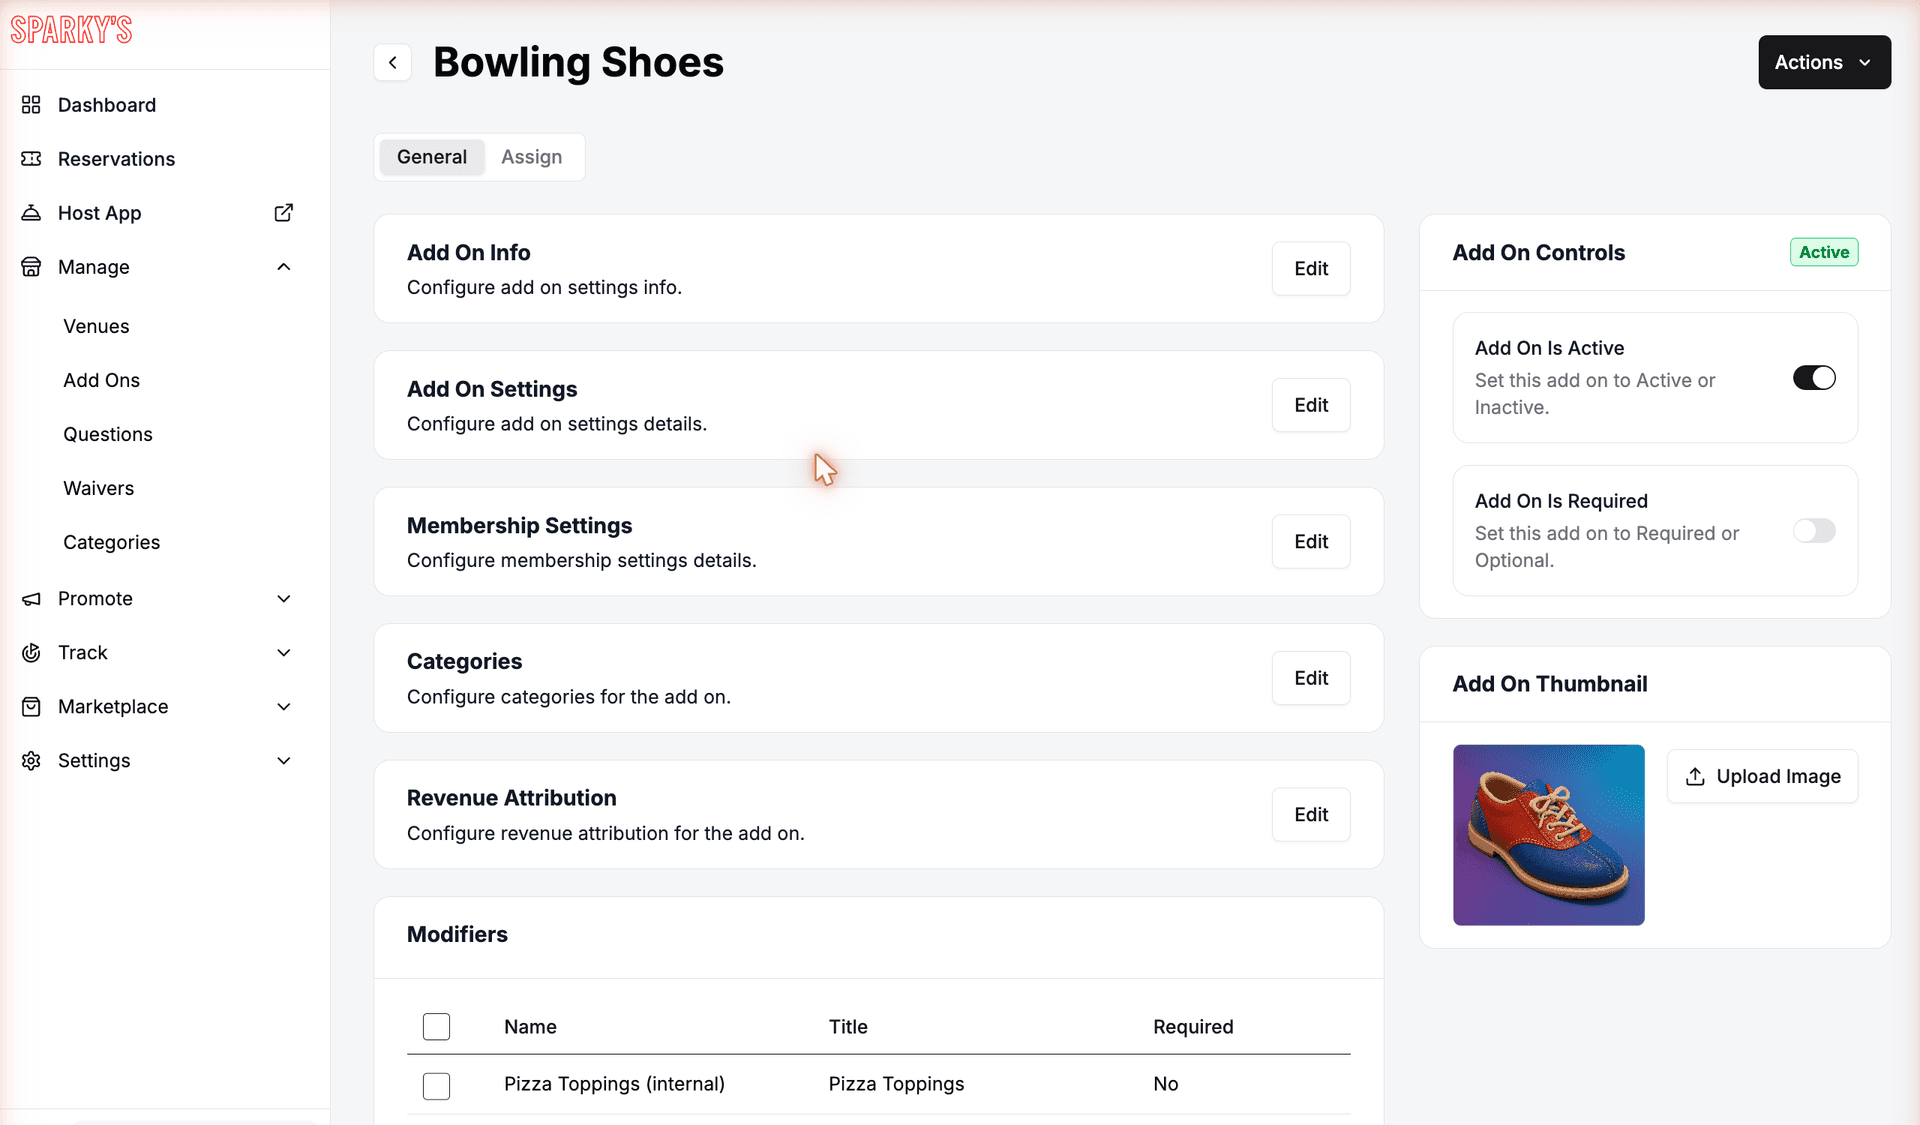
Fill in the add-on details
On the General tab, click Edit on the Add On Info card to set what guests see.
| Field | Description |
|---|---|
| Add On Name | The name guests see on the booking page, e.g. "Birthday cake". |
| Add On Internal Name | A name for your team in reports and admin views. Not shown to guests. |
| Add On Priority | Controls the order add-ons appear in. Lower numbers show first. |
| Add On Short Description | A one-line description shown on the add-on card (up to 140 characters). |
| Long Description | A longer, rich-text description shown when a guest opens the add-on. Good for details like flavors, sizes, or what's included. |
Activate it and add an image
On the right of the General tab, the Add On Controls panel has two switches, and below it you can upload the picture guests see.
| Field | Description |
|---|---|
| Add On Is Active | Turn this on to make the add-on available. An inactive add-on is saved but never shown to guests. |
| Add On Is Required | Turn this on to force guests to select the add-on before they can check out (on packages it's assigned to). |
| Add On Thumbnail | Click Upload Image to set the photo shown on the add-on's card at checkout. |
Set pricing and quantity
Pricing lives on the Add On Settings card. Click Edit on that card to set how much the add-on costs and how many a guest can order.
Choose a pricing method
Pick how the base price is calculated.
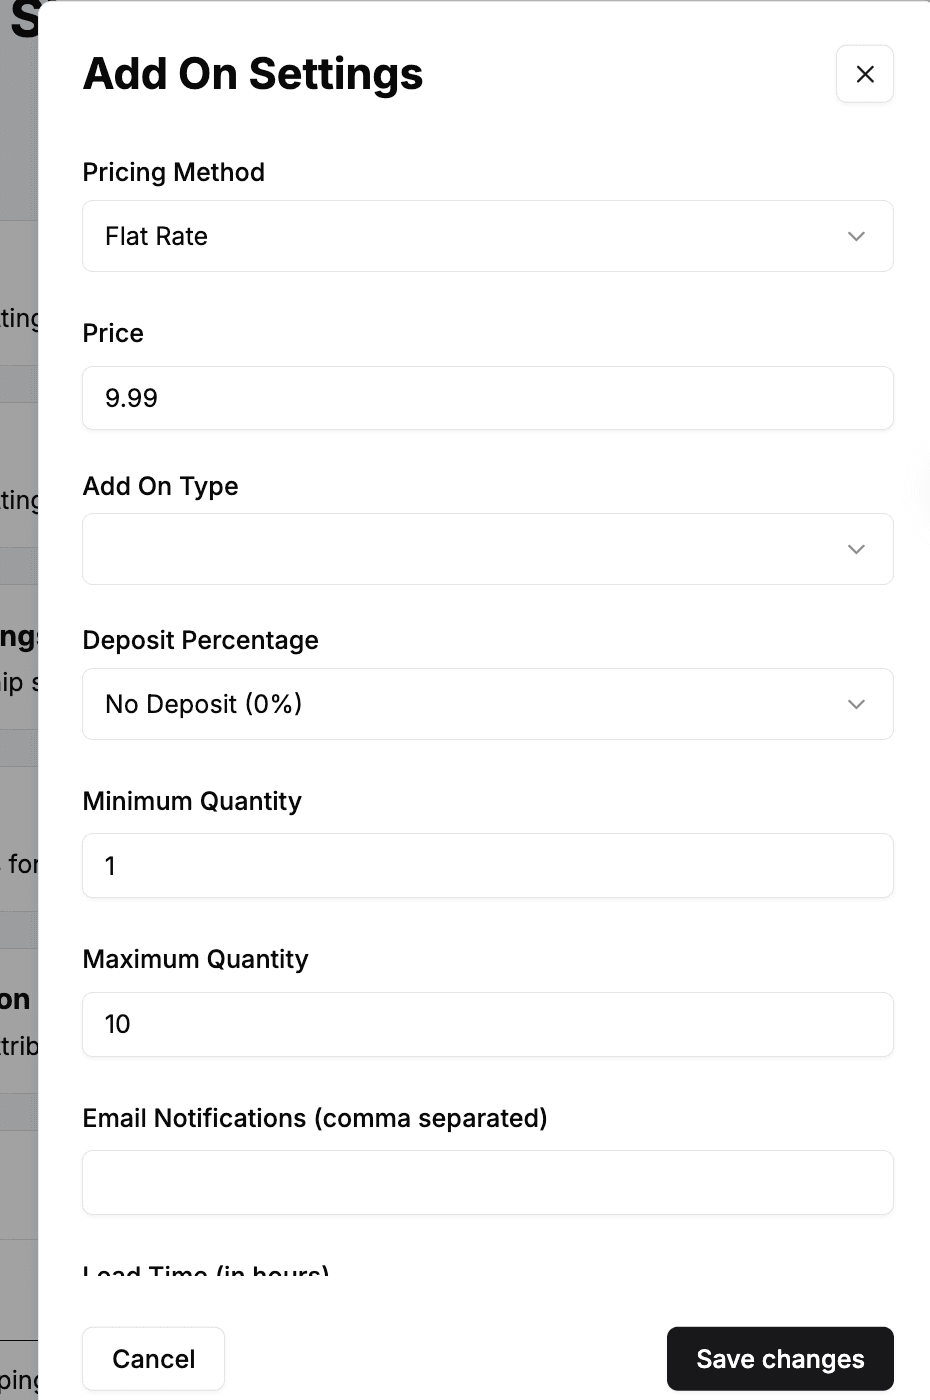
Flat Rate
Most commonCharges a fixed price per unit, no matter how long the booking is.
Best for: A $40 cake, a $15 t-shirt
Per Hour
Multiplies the price by the booking's length in hours.
Best for: A $20/hour equipment or coaching add-on
Set the price and add-on type
Enter the Price, then choose an Add On Type. The type controls how the quantity works and, for some types, what the add-on does to the booking. Pick the one that matches the kind of extra you're selling — the breakdown below shows when to use each.
Choosing the right add-on type
Most add-ons are Package Based. Reach for the others only when the extra is tied to your headcount, your resources, or the length of the booking.
Package Based
DefaultA simple line item with a fixed quantity per booking — it doesn't change with guests, resources, or time. The guest just picks how many they want, within your min/max.
Best for: One-off extras: a cake, a balloon bundle, a gift card
Guest Count
Adds guests to the reservation — each one bought is an extra person added to the party. Because it's a separate add-on, you can charge these guests a different rate than the package's per-person price.
Best for: Adding guests at their own rate: spectators, non-players, kids
Resource Based
Books an actual resource (a lane, bay, or table) as part of the reservation — not just a charge on the receipt.
Best for: Extras that take up a physical spot: an added lane or table
Time Based
Adds time to the booking. Set a Duration (minutes), and each one a guest buys extends the reservation by that much.
Best for: Upgrades like "add 30 minutes" or "extra hour"
Set the quantity range and deposit
Set Minimum Quantity and Maximum Quantity to control how many a guest can order (max must be greater than or equal to min). For Deposit Percentage, choose No Deposit (0%) to let guests pay for this extra at the venue, or Use Package Deposit to charge it under the package's deposit rule. Click Save changes.
To charge sales tax on an add-on, you set it separately, per package, on the Assign tab — see "Add tax to an add-on" below. The Add On Settings card sets price and quantity only.
Fine-tune how the add-on behaves
The rest of the Add On Settings card controls notifications and how the add-on shows up for guests. All are optional.
| Field | Description |
|---|---|
| Email Notifications (comma separated) | Email addresses that get notified whenever this add-on is booked — useful for a kitchen or events team. |
| Lead Time (in hours) | How far in advance a guest must add this item. A cake that needs a day's notice might use 24. |
| Allow Customer Notes | Gives guests a text field on this add-on — e.g. "Happy Birthday Sam" on a cake. |
| Match Guest Count | Automatically sets the quantity to the number of guests. |
| Match Resource Count | Automatically sets the quantity to the number of resources booked. |
| Hide Quantity Picker | Hides the quantity selector from guests when the quantity is set automatically. |
| Hide Price | Hides the price on the booking page — useful for included or $0 items. |
| Auto Add Addon | Adds the add-on to the cart automatically, without the guest selecting it. |
Three more optional cards sit below: Membership Settings (turn on Member Only Addon to limit the add-on to chosen membership plans), Categories (group add-ons so guests can filter them at checkout), and Revenue Attribution (map the add-on to a revenue category for reporting).
Assign add-ons to packages
An add-on does nothing until it's assigned to a package. Assignment is also where you set tax and fees, so this is the most important step.
Open the Assign tab
On the add-on's detail page, click the Assign tab. It lists every package the add-on can attach to, with its venue and pricing method. Use the filter and search to narrow a long list.
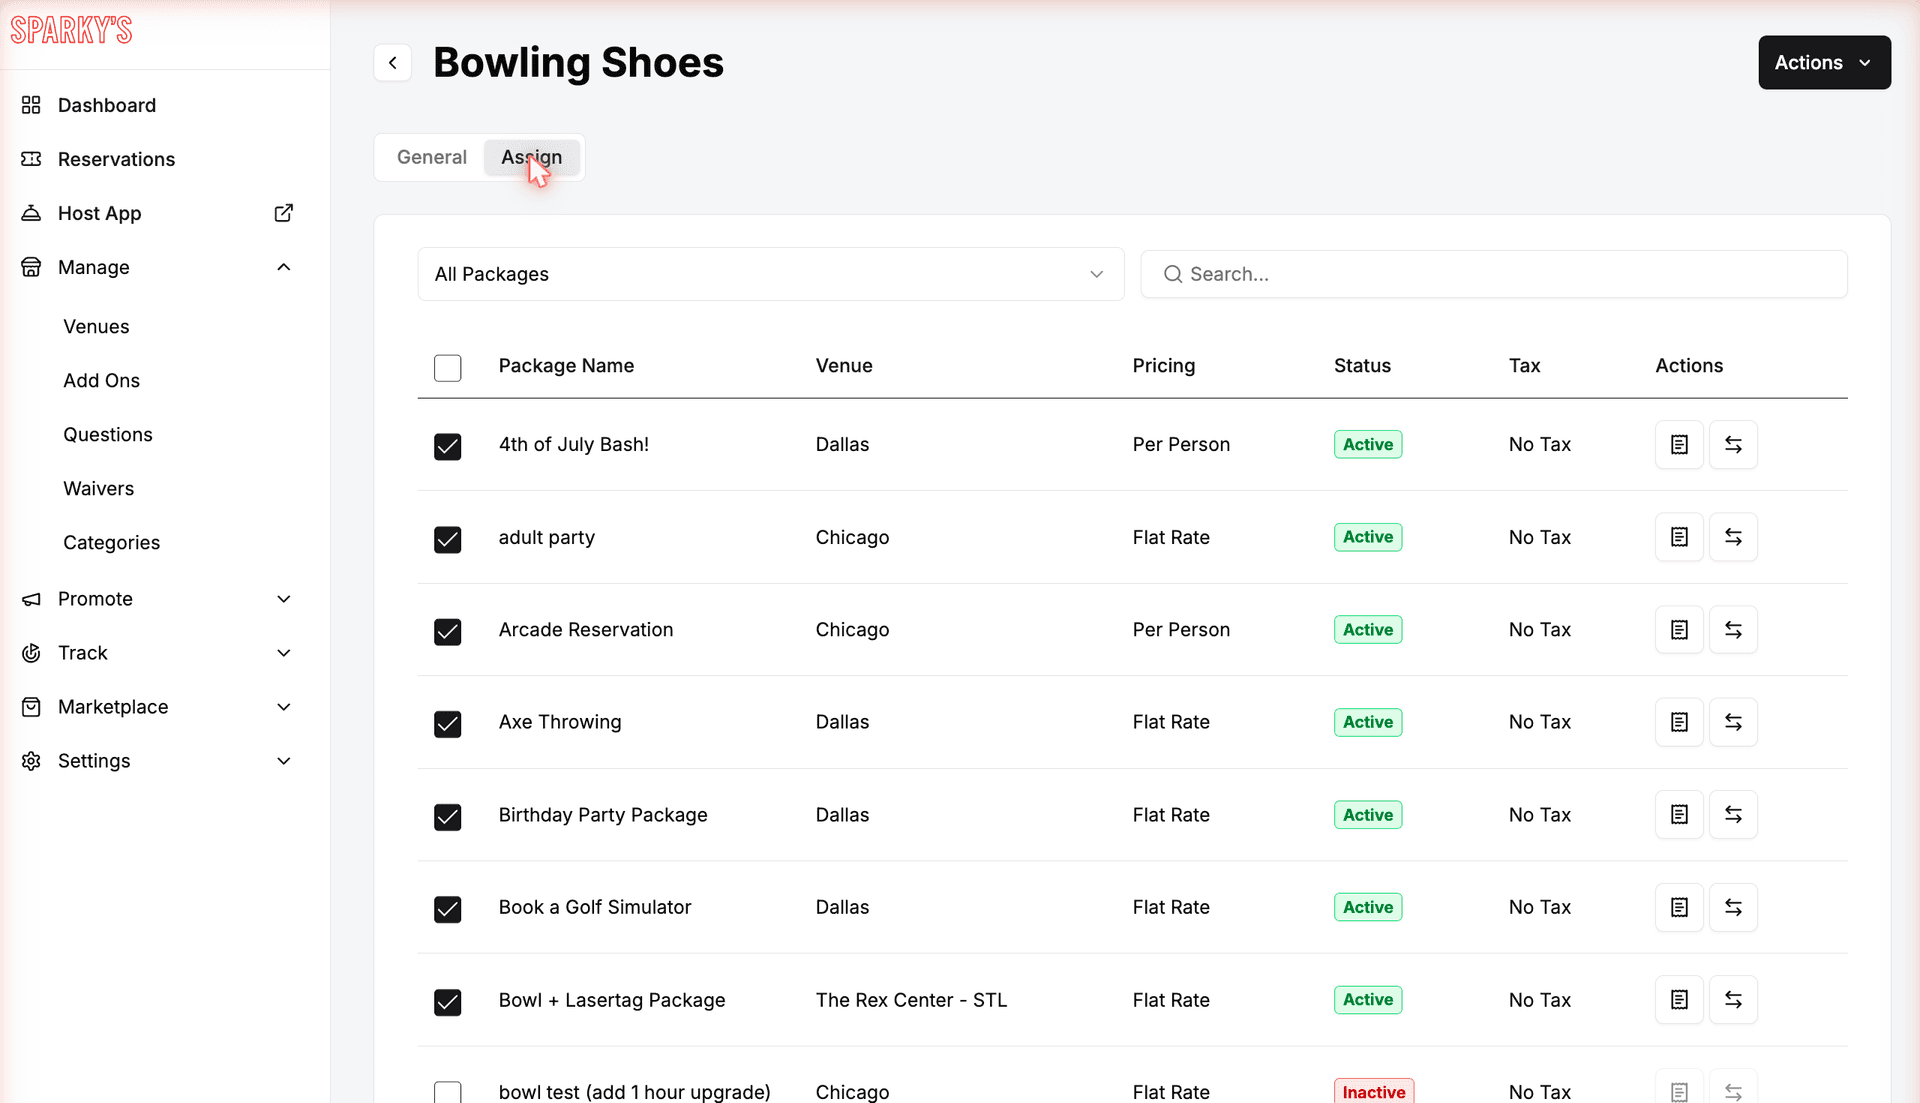
Turn the add-on on for each package
Check the box next to a package to make the add-on appear on that package's booking page. Uncheck to remove it. Changes save immediately.
Add tax to an add-on
Tax is applied per package, on the Assign tab — so the same add-on can be tax-free in one package and taxed in another. Before you can apply a tax, it has to exist on the venue.
Set up your venue's taxes first
Open the venue, go to Venue Settings, and click Edit on the Taxes card. Set your Sales Tax (%) — this becomes the "Venue Tax" option — and add any one-off rates under Additional Taxes (each has a Tax Name, a Tax Type of % or Flat Rate, and a Tax Amount). Save.
Open the Tax & Fees editor for a package
Back on the add-on's Assign tab, make sure the package is checked, then click the receipt icon (Edit Taxes & Fees) in that row's Actions column. The "Edit Addon For [package]" dialog opens on the Edit Tax tab.
Choose which taxes apply
Check Venue Tax to charge your standard rate, and check any custom taxes that should also apply — you can select more than one. Check No Tax to make the add-on tax-exempt for this package (it clears the others). Click Save changes.
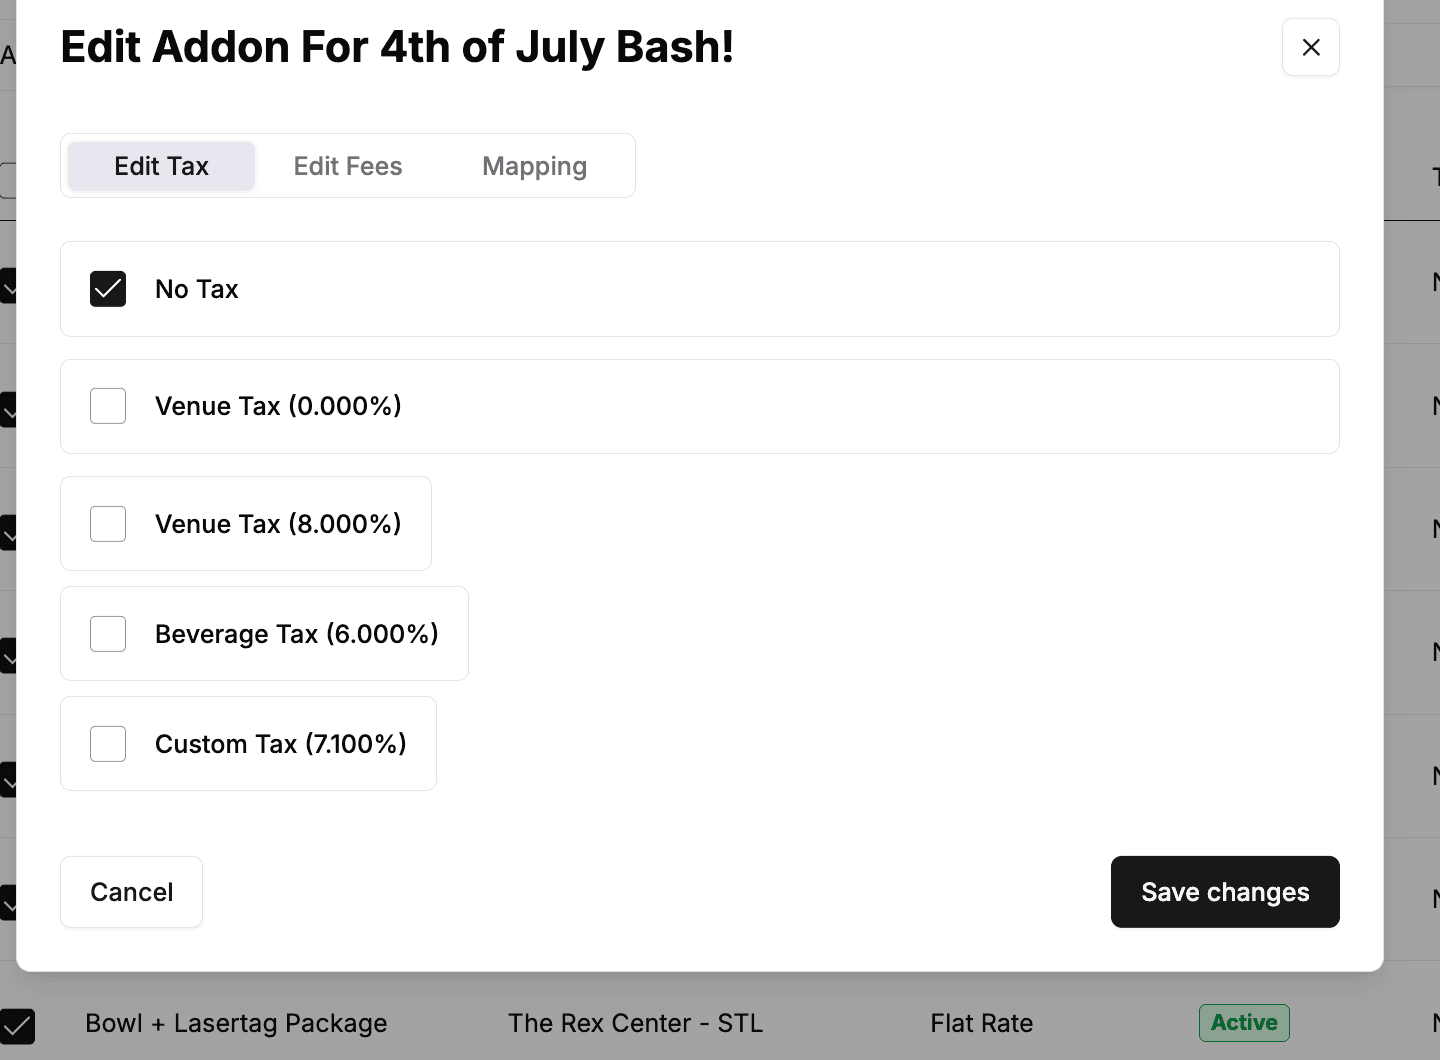
Don't see your tax in the list? It isn't set up on the venue yet. Add it under Venue Settings → Taxes (step 1), then reopen this dialog.
Add a service fee (optional)
In the same Edit Addon For… dialog, switch to the Edit Fees tab and click Add item. Each fee has a Fee Name (shown in reports), a Fee Type (% of the add-on price, or Flat Rate for a fixed amount), the Fee amount, and a Tax dropdown that controls whether the fee itself is taxed. Use it for things like a delivery fee or gratuity. Save when done.
The Mapping tab in the same dialog links the add-on to a GoTab product, Square catalog item, or Tripleseat field so orders sync to your POS.
Let guests customize with modifiers
Modifiers are choices a guest makes on an add-on — a flavor for a cake, a size for a drink package, a print for a t-shirt. Like add-ons, modifiers are built once and can be reused across many add-ons.
Create a modifier group
In the Add Ons section, open the Modifiers tab and click Create Modifier. Give it a Modifier Title guests see (e.g. "Cake flavor"), an internal name, a Modifier Type (Single Select for one choice, Multi Select for several), and a priority. Save changes.
Add the options
Open the modifier and click Edit on the Options card, then Add Option for each choice. Each option has a Name (e.g. "Chocolate"), a Price (the extra charge when chosen — enter 0 for no charge), and a priority. For Multi Select, set the minimum and maximum number a guest can pick.
Assign the modifier to an add-on
Open the add-on's General tab, scroll to the Modifiers card, and check each modifier you want active on it. Changes save immediately.
Modifiers are shared. One group can be attached to many add-ons, and deleting it removes it everywhere. To take it off a single add-on, just uncheck it in that add-on's Modifiers card instead of deleting it.
What guests see at checkout
After a guest picks a package and time, Rex shows an Add Ons step (it only appears when the package has add-ons assigned). Each add-on shows as a card with its image, name, short description, and price, plus a + button to add it. The running Order Summary updates as guests add or remove extras.
Tapping + opens a detail view where guests read the full description, choose any modifiers, and set the quantity. A few behaviors worth knowing:
- Required add-ons show a red asterisk and must be selected before the guest can continue ("*Required Add On").
- Category filters — if your add-ons have categories, a filter bar appears so guests can jump to, say, just food or just merch.
- Member-only add-ons show a sign-in button instead of +, and prompt the guest to log in or view membership options.
- Purchase minimums — if the package requires one, guests see a prompt until their subtotal clears the threshold.
Once everything is set up, run through your own reservation page to confirm the add-ons, prices, modifiers, and tax all show the way you expect.
Updated Jun 16, 2026
Was this helpful?