Create contact-only packages
A contact-only package shows on your reservation page but doesn't display available times. When a guest selects it, instead of booking they're sent to your contact form — or to any web address you choose — to enquire through a representative. You control both the button's label and where it sends guests, on each package.
Open the package
Go to the Packages tab for the venue you're configuring and open the package you want to make contact-only.
Finish the package details first
Set the name, description, image, and any other fields before switching on contact-only — booking-specific settings like schedule and pricing stop applying once it's on.
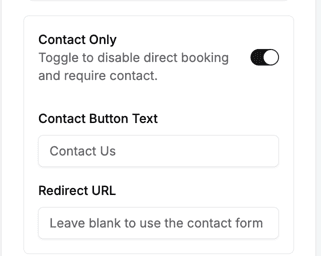
Turn on Contact Only
In the Package Controls card, switch the Contact Only toggle on. This disables direct booking for the package and reveals two fields beneath it.
Set the button label and where it links
Enter Contact Button Text for the label guests see on the button (up to 30 characters) — leave it blank to use your venue's default contact label. Enter a Redirect URL to send guests to a specific web address when they click; leave it blank to send them to your venue's contact form instead.
Save and verify
Save your changes, then open your reservation page. The package shows your contact button in place of times — clicking it opens the Redirect URL if you set one, or your contact form if you left it blank.
Both fields are optional. Leave them blank and the package behaves the way contact-only always has — your venue's default contact button label, linking to your contact form.
Updated Jun 24, 2026
Was this helpful?