Collect signed waivers from guests
Rex lets you collect signed waivers from guests as part of booking. Waivers are powered by DocuSeal — you build your waiver document in a DocuSeal editor embedded right in Rex, then attach it to the packages and membership plans that require it.
There are three main parts: create a waiver template, build its content in the editor, then require it on the packages or memberships that need it.
Waivers must be enabled on your plan. If you don't see Waivers in the left-hand menu — or you see an upgrade prompt instead — contact Rex to enable the feature.
Create a waiver template
Open the Waivers page
Open Waivers from the left-hand menu.
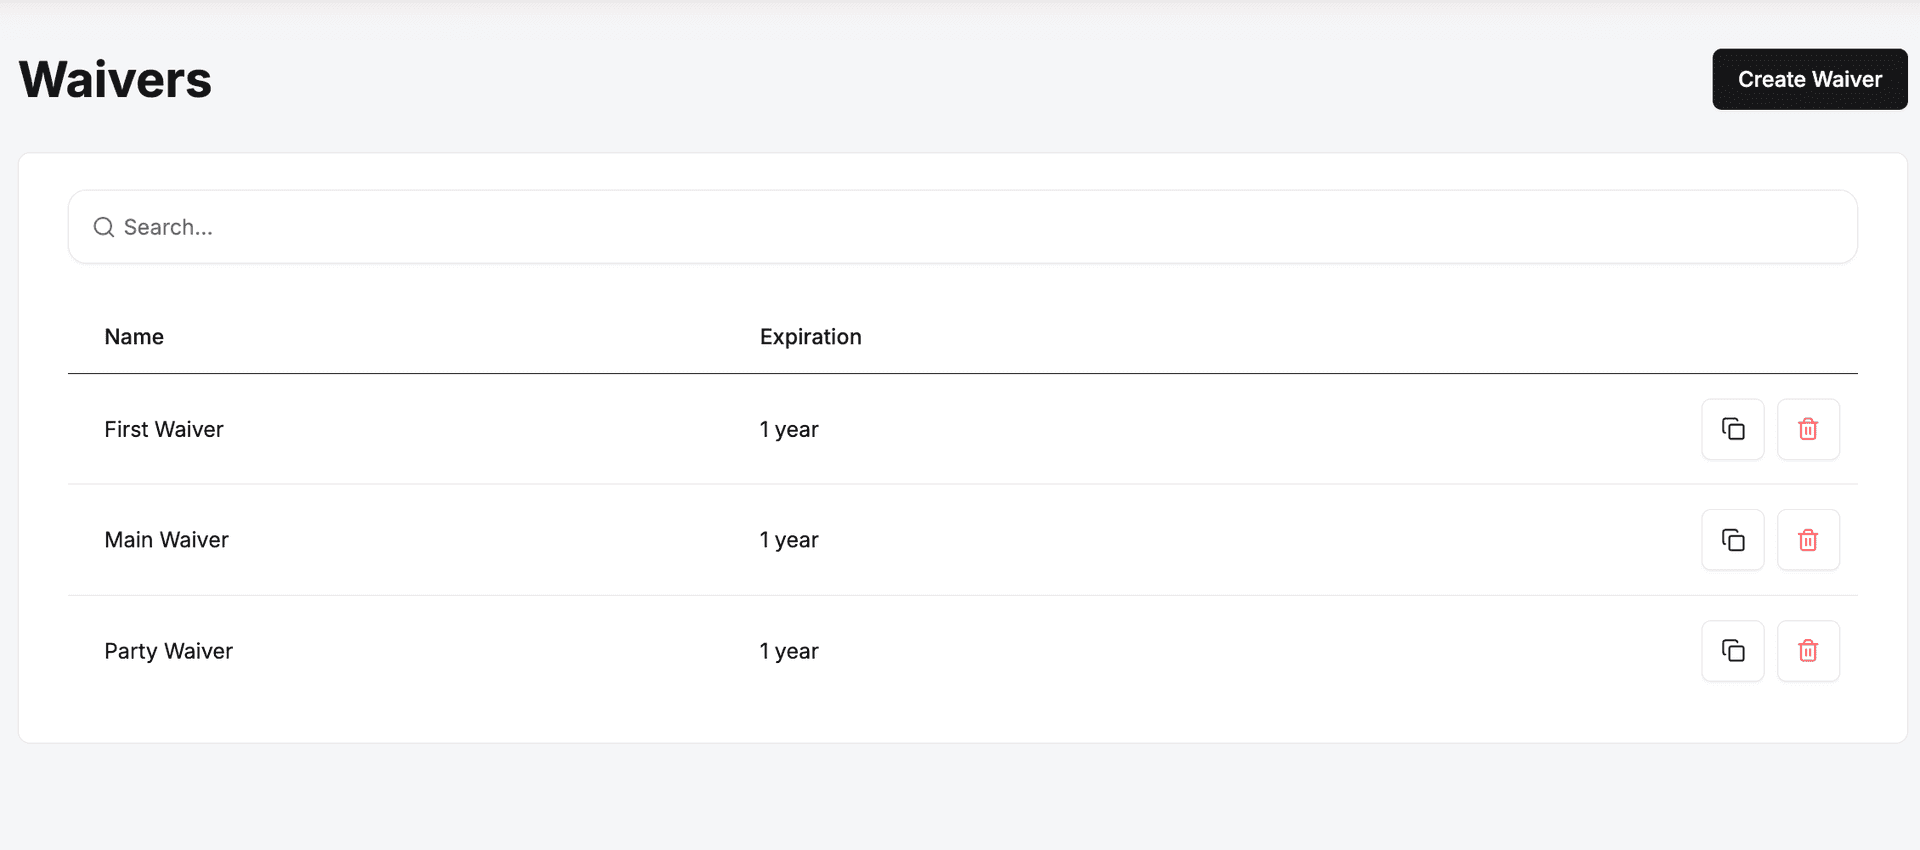
Click Create Waiver
Click Create Waiver to open the Create New Template window.
Name the waiver and set a duration
Enter a Name (for example, "Liability Waiver") and choose a Duration — how long a guest's signature stays valid before they're asked to sign again. Options are 1 week, 1 month, 3 months, 6 months, 1 year (default), or Never.
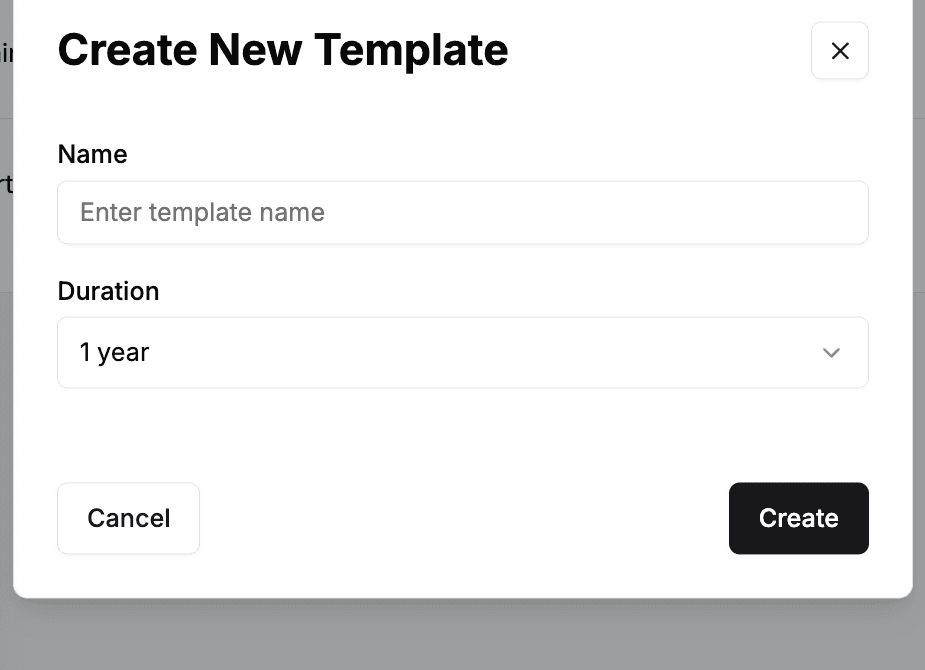
Create the template
Click Create. Your new template appears in the list, showing its Name and Expiration (the duration you chose). The waiver document itself is added in the editor — next.
What Duration means: once a guest signs, they won't be asked to sign the same waiver again until it expires. With a 1 year duration, a returning guest who signed three months ago can book without re-signing.
Build the waiver content
Building a waiver happens in two stages, both inside the DocuSeal editor embedded in Rex: first you upload a base document (typically a PDF of your liability waiver), then you make it fillable by placing the fields guests complete — name, signature, date, and so on.
Open the template
On the Waivers page, click the template you just created. The DocuSeal editor opens.
Upload your base document
Upload the document you want guests to sign — typically a PDF of your liability waiver. This becomes the base layer of the template; on its own it isn't fillable yet.
Add the fields guests fill in
Drag fields from the builder onto your document — signature, name, date, checkboxes — wherever guests need to fill something in. This is what turns the static document into a fillable form.
Save your changes
Click Save (top right) to return to your list of templates. You can reopen any template anytime to make changes — just click it in the list.
The editor is DocuSeal's own document builder. For step-by-step help laying out your document, adding and configuring fields, and formatting, see DocuSeal's help center.
Manage and share your templates
On the Waivers page, each template has a few actions:
- Edit — click the template row to reopen it in the editor.
- Copy link — click the copy icon to get a shareable waiver link. You can choose from three link types (below).
- Delete — click the trash icon to remove a template.
| Field | Description |
|---|---|
| Copy waiver link | The standard shareable waiver link. |
| Copy waiver link with logout | Signs the current user out first — useful on shared or kiosk devices so the next person signs as themselves. |
| Copy waiver link for guest | A link for guests who don't have an account. |
Share a copied link by email, text, or a QR code so guests can sign ahead of time.
Require a waiver for a package
Attaching a waiver to a package is what actually asks guests to sign during booking. The Waiver Rule you pick controls when the guest signs:
| Field | Description |
|---|---|
| Force Waiver Before Checkout | The guest must sign before they can pay and complete the booking. |
| Force Waiver At CheckIn | The guest isn't required to sign during online booking — the waiver is required at check-in instead. |
| Waiver Optional | The waiver is available but not required. |
Open the package's Waiver Settings
Open the package you want, then go to its Waiver Settings section ("Manage waiver requirements for this package"). This is where you turn the waiver on and set the rules.
Enable the waiver
In Waiver Settings, turn on Enable Waiver.
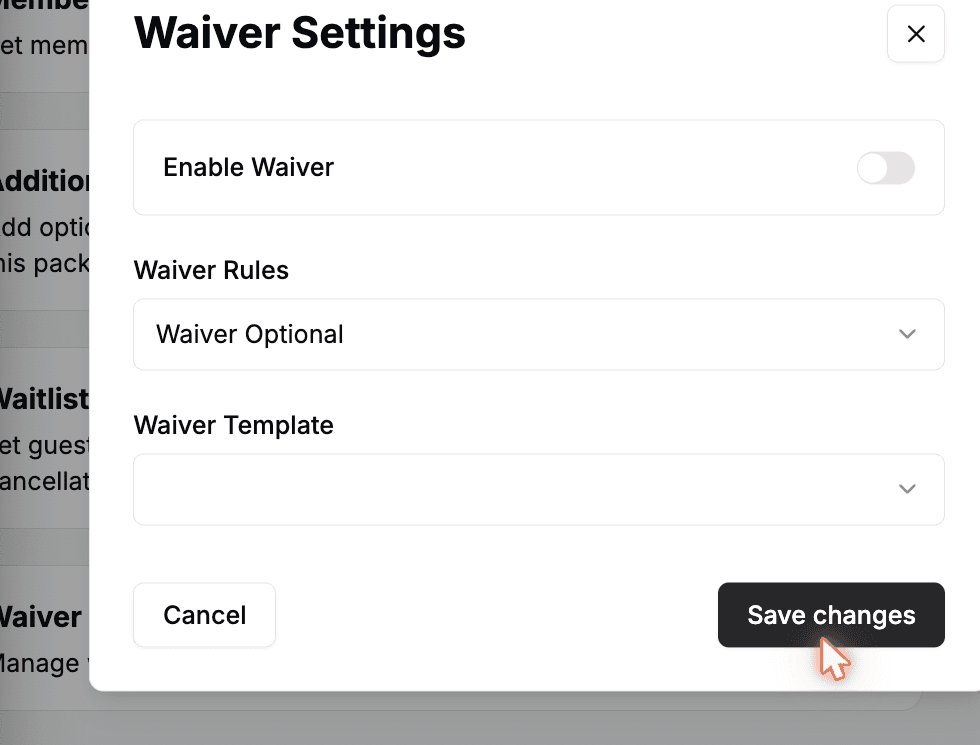
Set the waiver rule
Set the Waiver Rule using the options above — when the guest must sign.
Choose a template
Select the Waiver Template to use — one of the templates you created. This is required whenever waivers are enabled.
Save the package
Click Save.
Repeat this for every package that needs a waiver. Different packages can use different templates and different rules.
Require a waiver for a membership (optional)
Membership plans can require a waiver too. The steps mirror packages, with one difference: memberships don't offer the At CheckIn option — just Force Waiver Before Checkout (must sign before completing signup) or Waiver Optional.
Open the plan's Waiver Settings
Edit the plan you want, then go to its Waiver Settings section. This is where you turn the waiver on and set the rule.
Enable the waiver
In Waiver Settings, turn on Enable Waiver.
Set the rule and template
Choose a Waiver Rule (Force Waiver Before Checkout or Waiver Optional) and select the Waiver Template.
Save the plan
Click Save.
What guests see
When a package is set to Force Waiver Before Checkout, the guest signs the waiver during booking — after confirming their details and before payment. They complete and sign it right on screen, then continue to pay.
- A guest who has already signed that waiver — and whose signature hasn't expired — skips the step automatically.
- A guest can decline and go back to choose a different package.
Signing through a shared link
Waivers can also be signed without a booking. When a guest opens a shared waiver link, they sign in or create an account first — or skip straight through if you shared the guest version of the link.
If your venue collects profile photos, the guest is asked to add one (they can skip it). The waiver then opens with their email pre-filled; they read it, complete the required fields, and sign.
After submitting, a confirmation banner verifies the waiver is signed, and the signature counts toward any package that uses that template — for as long as the template's duration allows.
After guests sign
Every submission is stored with the guest. To find a signed waiver later — from the Host App's Waivers page or directly from a reservation — see Find and view signed waivers.
Troubleshooting
There's no Waivers option in the menu, or you see an upgrade prompt
Possible causes
- •The waiver feature isn't enabled on your plan.
Fix
Contact Rex to enable waivers.
Guests aren't asked to sign during booking
Possible causes
- •The package has no waiver attached, or its rule isn't set to Force Waiver Before Checkout.
Fix
Open the package's Waiver Settings, turn on Enable Waiver, set the rule, and select a template.
You can't save a package with waivers enabled
Possible causes
- •No Waiver Template is selected.
Fix
Pick a template — it's required whenever Enable Waiver is on.
A returning guest is asked to sign again
Possible causes
- •Their previous signature has expired.
Fix
This is expected based on the template's Duration. Increase the duration if you want signatures to last longer.
Updated Jun 12, 2026
Was this helpful?